O-Sense

.jpg)


INTRODUCTION

3D printing has evolved into a remarkably versatile craft, no longer limited to enthusiasts tinkering in garages but embraced by designers, engineers, and everyday problem‑solvers who want to turn digital ideas into physical objects with precision and speed. Modern machines emphasize consistency, smarter motion systems, and materials that once belonged only in industrial workshops, making the technology feel more approachable than ever. As the field keeps expanding, each new model tries to balance performance with ease of use, and that’s where Creality’s K2 Pro Combo steps in.
Shenzhen Creality 3D Technology Co., Ltd., known as Creality, is a world-leading brand of consumer 3D printers. Since our establishment in 2014, we have embraced our role as an "3D Printing Evangelist" committed to the innovation, application, and popularization of 3D printing technology worldwide. Our forward-looking business strategy, termed "One Core with Two Wings," has propelled our rapid growth. Specifically, 3D printer products are at the “Core” of our business, which is assisted by the first “Wing” of ecosystem products like 3D scanners, laser engravers, filaments, and accessories. A second “Wing” of our business is Creality Cloud, an all-in-one 3D printing platform that gathers 3D models and enables a cloud printing experience.
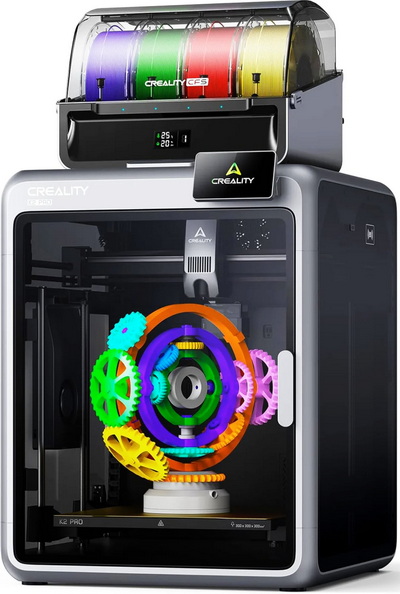
Modern high‑speed printers live or die by the balance between raw motion performance and environmental control, and Creality’s K2 Pro Combo leans into that philosophy with a surprisingly robust spec sheet. Its CoreXY system is tuned for up to 600mm/s print speeds and 30.000mm/s² acceleration, supported by a rigid frame and a fully enclosed, actively heated chamber that can reach 65°C to stabilize demanding filaments. The hotend pushes temperatures up to 300°C, while the bed heats to 120°C, opening the door to materials like ABS, ASA, PETG, TPU, and various composites. Creality’s CFS unit adds multi‑material capability with up to 16‑color support (4 CFS units), and the dual AI cameras handle print monitoring, spaghetti detection, and time‑lapse capture. The build surface uses a flexible PEI plate for reliable adhesion and easy part removal, and control is handled through a responsive 4.3‑inch touchscreen that keeps navigation straightforward. With automated leveling, a 300x300x300mm build area, and a tightly managed thermal environment, the K2 Pro Combo positions itself as a machine built for users who want speed without sacrificing consistency or material flexibility.
SPECIFICATIONS AND FEATURES

PACKAGING AND CONTENTS

Creality uses a newly designed box for the K2 Pro Combo the front and rear of which have their logo and a product drawing.

Contact information for Creality and several certification and warning logos are placed on the sides.

Packing is pretty flawless so there were no problems with our sample.

As expected, the entire bundle (minus the top tempered glass cover which is taped on the side of the printer) is placed inside the K2 Combo.

Aside the K2 Pro and the CFS inside the box we also find the top tempered glass cover, white hyper PLA filament, LCD touchscreen, 4 PTFE tubes, two 485 cables, buffer, buffer mounting screws, filament mount, glue stick, metal grease, cleaning tools, Allen keys, USB flash drive, tube/filament cutting tool, power cord, stickers, quick installation guides (K2 Pro printer & CFS), after sales service card, and two creality certification papers.

Creality has placed two plastic mounts inside the printer which hold the CFS in place.
THE K2 PRO COMBO

The K2 Pro is a medium to large size FDM printer that weighs 23.7Kg and measures 850mm in height, 445mm in width and 505mm in length/depth.

Creality has placed the LCD touchscreen mount on the front top right.

A USB-A port and the RFID scanner are located on the right side as seen above.

 At the rear we find three perforated areas (exhausts), filament waste outlet, on/off switch, power port, RJ45 LAN port and a 485 port.


After you have removed the CFS from the interior of the K2 Pro you will also need to remove the two plastic pieces holding it in place and 6 more (you will need one of the bundled Allen keys for some of them).

I was glad to see that Creality has used a flexible PEI plate (much like the one used in the Hi-Combo).


Inside the K2 Pro we also find a heater, blower fan (cooling), air-purifier compartment, residue cleaner and a HD (720p) camera.


The direct drive extruder Creality has used features a built-in run out sensor and is very easy to take apart.

According to Creality there’s also an AI camera right behind the extruder which ensures your prints complete properly.

This is the 2nd time I’ve received Creality’s CFS so once again it’s primarily made of plastic and measures 314mm in width, 276mm in height and 314mm in length/width.


Inside we find 4 filament spots and two large silica gel packs placed in separate compartments.


Turning the CFS around we find two PTFE ports and two 485 ports.
ASSEMBLY
3D printers like the K2 Pro require no assembly but you still need to attach a few things.


In this model first thing to attach is the LCD touchscreen which can also tilt a few degrees.

Next in line is the buffer which attaches at the rear and just over the filament waste outlet.


Finally for people who haven’t gotten the Combo version it’s the filament spool holder.

For my tests I used a total of 4 Hyper PLA filaments by Creality (black, white, red and blue).

Both temperature and moisture are in good levels where I do all my 3D printer tests.

In most marketing pictures Creality has the CFS placed on top of the K2 Pro but since for PLA prints the top tempered glass panel should be removed, I chose to place it next to the printer instead (this is the best one can do with the bundled 485 cables).
DISPLAY MENUS


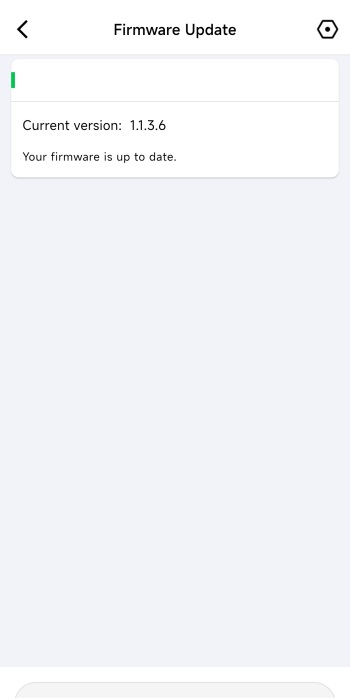
Once again, the moment you power the K2 Pro Combo for the first time you will need to choose the language, connect it to the Internet via Wi-Fi, set the time zone and wait for it to complete a self-check.

Typically, the printer will also check for firmware updates and in my case v1.1.3.6 was available.


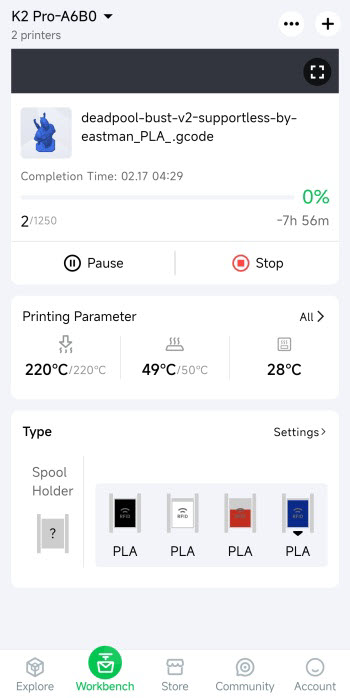
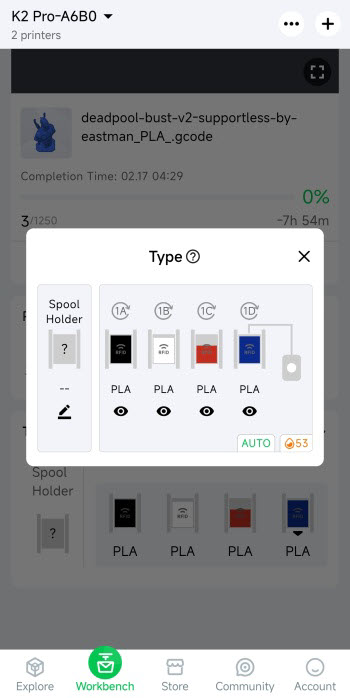
From the main tab you can check and adjust current temperatures (printing platform, enclosure and extruder), turn the LED light on/off, access local files (built-in memory and USB) and see what filaments are installed (only after you complete that step).


Second tab gives you control over the axis, temperatures and print plate, allows you to load/unload filaments (easy to do with RFID, just press the loading circle on top of each filament position), adjust print settings like AI detection and perform calibration (auto leveling, cutter calibration and input shaping).

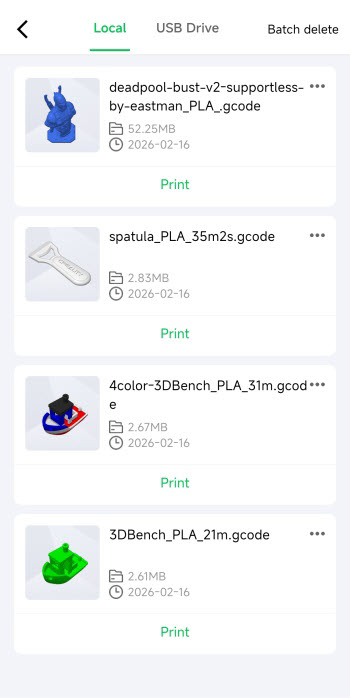
Third tab list 3D model thumbs found in the built-in memory (if you print something from the USB it first gets copied to the local memory) and the USB (also records what prints you’ve completed).


From inside the settings tab, you can adjust the brightness levels of the LCD touchscreen, set sleep time for the screen, change the language, enable/disable timelapse, enable/disable sounds, enable/disable automatic firmware updates during the night, access expert mode settings, check for updates and reset the printer to its factory settings.


The android tab contains the 2D barcode (wiki), prompts, logs and maintenance options.
CREALITY CLOUD
For extra control over your K2 Pro/Combo you should download the Creality Cloud app.
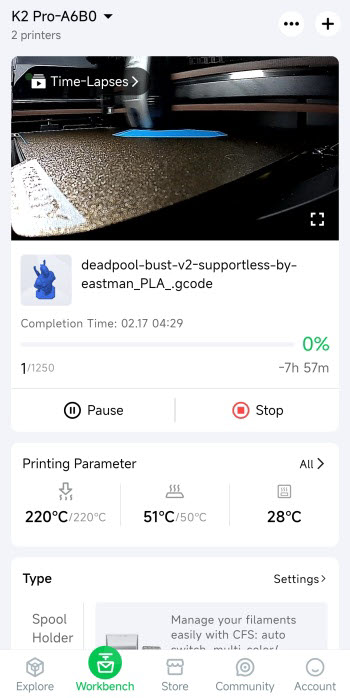
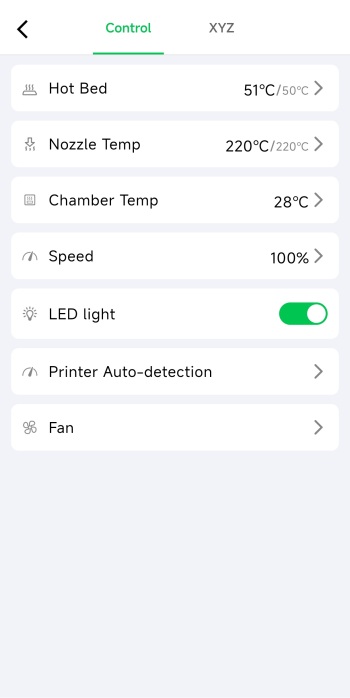
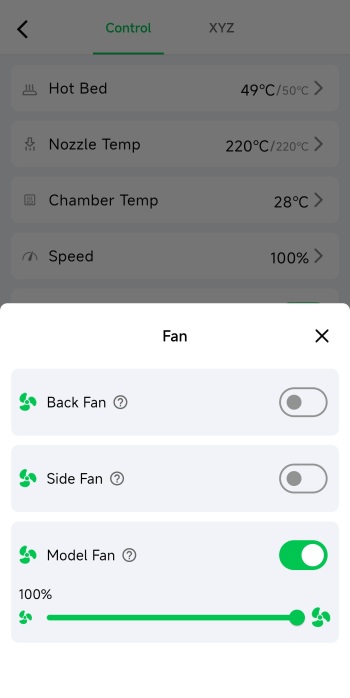
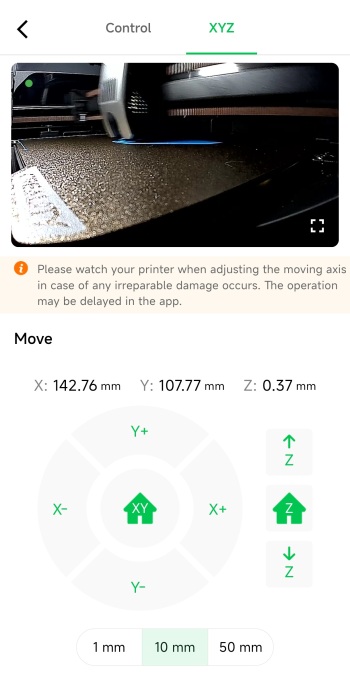
From inside the app you can watch what is being printed live, check the timelapse (once complete), control the printer (stop/pause), check temperatures, adjust speed, enable/disable the LED, adjust fan speeds, control the axis and the bed and check the status of the installed filaments.
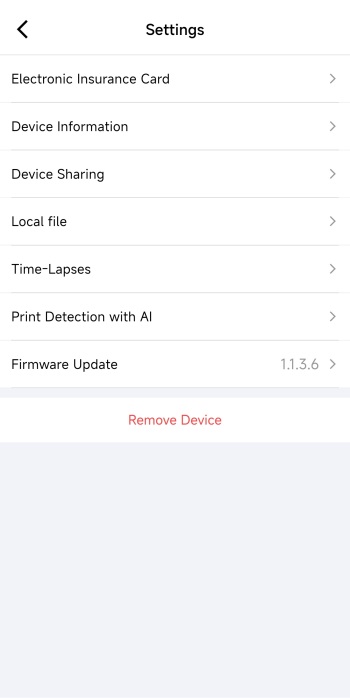
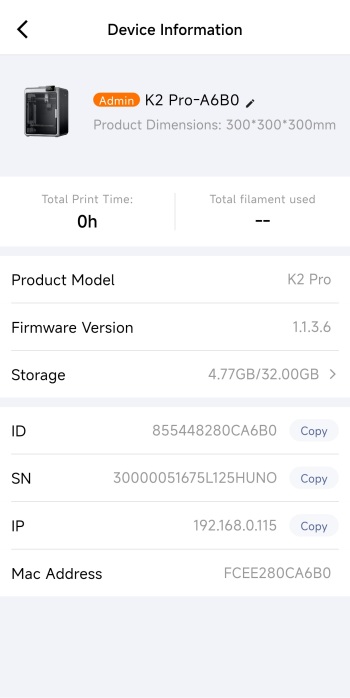
The settings tab contains your electronic insurance card and allows you to access information of the printer, share the printer with others, check local files and time lapses and check for firmware updates.
TESTING METHODOLOGY
Once again to test this printer by Creality I used their latest print software (Creality Print 6.2) by manually entering the same settings I’ve used to date with all FDM printers (quality of 0.16mm, 20% infill density and cubic infill pattern).
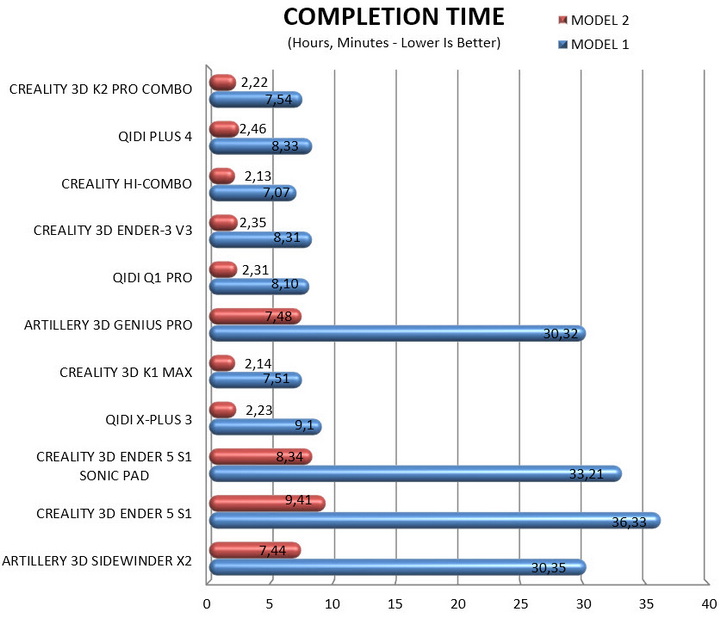
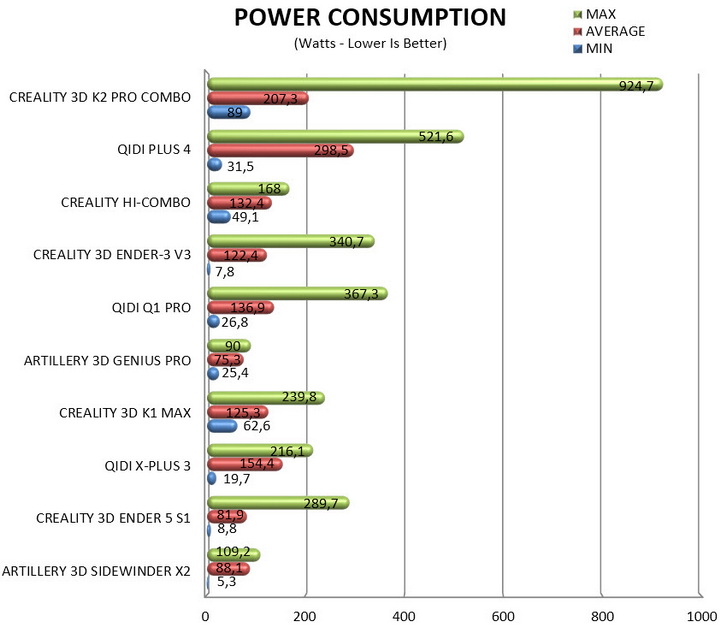
Nothing else has changed of course so again I’ll be using 2 different sized models (downloaded from Cults3D / member Eastman) to record completion time at 100% speed. Second thing to test are noise levels and so once again I’ll be using my ExTech HD600 decibel meter placed roughly 30cm away to record the maximum noise coming from the 3D printer while printing. As for the 3rd test with the help of an UPS and two power meters I decided to also record not only the lowest and highest but also the average instant power consumption of the 3D printer in my hands.


I’ve never had any complaints from Creality models when it comes to print quality and the K2 Pro Combo is not an exception (timelapse is available on both TikTok and YouTube).

Once again my sole concern is filament waste when printing complex multi-color models. Just take into account that not only did these two tiny pieces take longer to print compared to the large Deadpool bust but I also had to "sacrifice" 10 times the amount of filament as you can see from the above picture (and this isn't just with the K2 Pro Combo, it's a general issue with all multi-color printers).
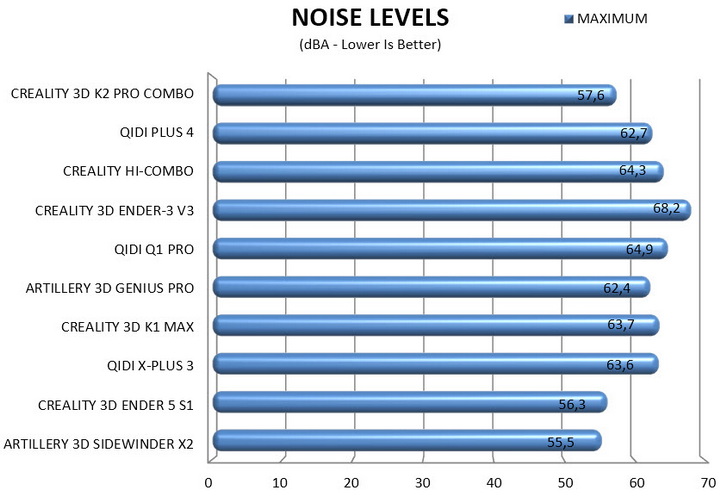
TEST RESULTS
CONCLUSION
The K2 Pro Combo ultimately is a 3D printer built to deliver fast, confident results, and its strengths show up immediately in day‑to‑day use. Its high‑speed motion system, dependable print quality, multi‑color capability through the CFS unit, responsive touchscreen, and grippy PEI plate all contribute to a workflow that rarely gets in your way. With the top glass installed, overall noise levels stay surprisingly controlled, and average power consumption during normal printing remains more than reasonable for a fully enclosed CoreXY system. Still, the multi‑color workflow comes with trade‑offs since even tiny models can take noticeably longer to complete, and the filament purging process generates a fair amount of waste. Peak power draw also climbs when the system is heating aggressively (this however matters very little, average consumption is what people should be looking at), and the nozzle‑cleaning routine is significantly louder than the rest of the printing cycle (without the top cover I could hear it from 3 rooms away – since this isn’t continuous it’s not recorded in the charts just like with other similar models). Even so, the K2 Pro Combo stands out as a capable, well‑rounded platform whose advantages will outweigh its compromises for users who want speed, stability, and the option to explore color‑rich projects.
Currently the K2 Pro Combo 3D printer by Creality retails for USD1049 inside the USA (Amazon.com) and for 1139Euros inside the EU (Creality Store) and so it’s priced more or less properly for what it has to offer. At the end of the day the K2 Pro Combo is not for people who are taking their first steps with 3D printing, it’s clearly aimed towards experienced users and even professionals and since currently it’s the best all around 3D printer to arrive in the lab (to date) it deserves the Platinum Award.

PROS
- Very Good Build Quality (Aerospace Grade Aluminum Alloy / Tempered Glass Panels)
- Very Fast (Up To 600ms Speed / 20000ms Acceleration)
- CFS Addon (4 Filaments Per CFS / Up To 16 Filaments)
- Print Quality
- Heated & Flexible PEI Print Bed
- Temperature Controlled Chamber
- High Speed Dual Gear Direct Drive Extruder
- G Sensor (Input Shaping)
- Automatic Leveling
- 4” Inch HD Color Touch Screen Display
- Air Purifier
- RFID Sensor
- WiFi, RJ45 Ethernet & USB Port
CONS
- 720p Camera (Subpar Timelapse Quality)
- Nozzle Cleaning Noise (For Some)
- Short 3D Printer To CFS Cable


.png)